CATEGORIES
- A free account
- Account assistants
- Account Information
- Affiliate Program
- Appearance
- AppSumo
- Attendee Portal
- Audio & Video
- Branding / Custom / Whitelabel
- Branding Tool
- Break-out Rooms
- Call to Action
- Camera & Microphone
- Capacity & Limits
- Certificates
- Closed captioning
- Decisions - Professional Voting
- E-mail templates
- Event tokens
- Evergreen webinars
- Forms
- How to join meeting on mobiles
- Hubspot Integration
- Integrations
- Language interpretation
- Live Transcription
- Meetings & Webinars
- Other
- Pabbly Connect
- Paid Webinars
- Presence Manager
- Recording
- Registration
- Requirements
- Room Chat
- Screen Sharing
- Session Management
- Statistics & Reports
- Storage
- Streaming
- Sub-Accounts
- Tests & Surveys
- Virtual Backgrounds
- Vote Manager
- Waiting rooms
- Webinar and Meeting Room Features
- Website Presenter
- Whiteboard
- Wordpress plugin
FAQ -> Other -> How to Anonymise Webinar Participant Data During Virtual Events
How to Anonymise Webinar Participant Data During Virtual Events
Webinar Data Privacy Guide: How to Protect Attendee Data and Stay Compliant
Hosting virtual events involves handling sensitive user data. As privacy regulations tighten globally, failing to safeguard attendee information can result in significant regulatory fines, loss of audience trust, and brand damage.
What is webinar data privacy?
Webinar data privacy refers to the technical and operational controls used during virtual events to collect, process, and store attendee information in accordance with global data protection laws like GDPR and CCPA.
Key Global Data Privacy Regulations
- EU GDPR (European Union General Data Protection Regulation): Requires explicit consent, data minimization, and strict security standards when handling data of EU residents.
- UK GDPR: The post-Brexit adaptation of the EU framework governing UK citizens' data protection.
- CCPA / CPRA (California Consumer Privacy Act / California Privacy Rights Act): Grants California residents the right to know, delete, and opt out of the sale or sharing of their personal information.
- LGPD (Lei Geral de Proteção de Dados - Brazil): Establishes guidelines for personal data processing across Brazil's digital environments.
- PIPEDA (Personal Information Protection and Electronic Documents Act - Canada): Governs how private-sector organizations collect, use, and disclose personal information in Canada.
Understanding PII in a Virtual Event Context
Personally Identifiable Information (PII) includes any data point that can directly or indirectly identify an individual attending your event. In a typical webinar room, PII includes:
- Direct Identifiers: Full names, email addresses, and corporate affiliations.
- Network & Location Data: IP addresses, network hostnames, and granular geolocation details.
- System Metadata: Operating systems, browser versions, and device types.
- User-Generated Content: Public chat logs, Q&A entries, and audio/video feeds.
Executive Summary / Quick-Answer Key
- Regulatory Compliance: Global privacy laws (GDPR, CCPA, LGPD) require hosts to minimize the exposure of attendee PII during live virtual events.
- In-Room Privacy: LiveWebinar allows hosts to mask full names to initials, hide device/OS metadata, and hide the entire participant list from attendees.
- Recording Data Hygiene: Anonymous recording templates must be applied before initiating a recording to exclude chat logs and participant identities from stored media files.
Step-by-Step Configuration Guide: LiveWebinar Privacy Controls
1. Disabling Geolocation Tracking
How do you disable geolocation tracking in LiveWebinar?
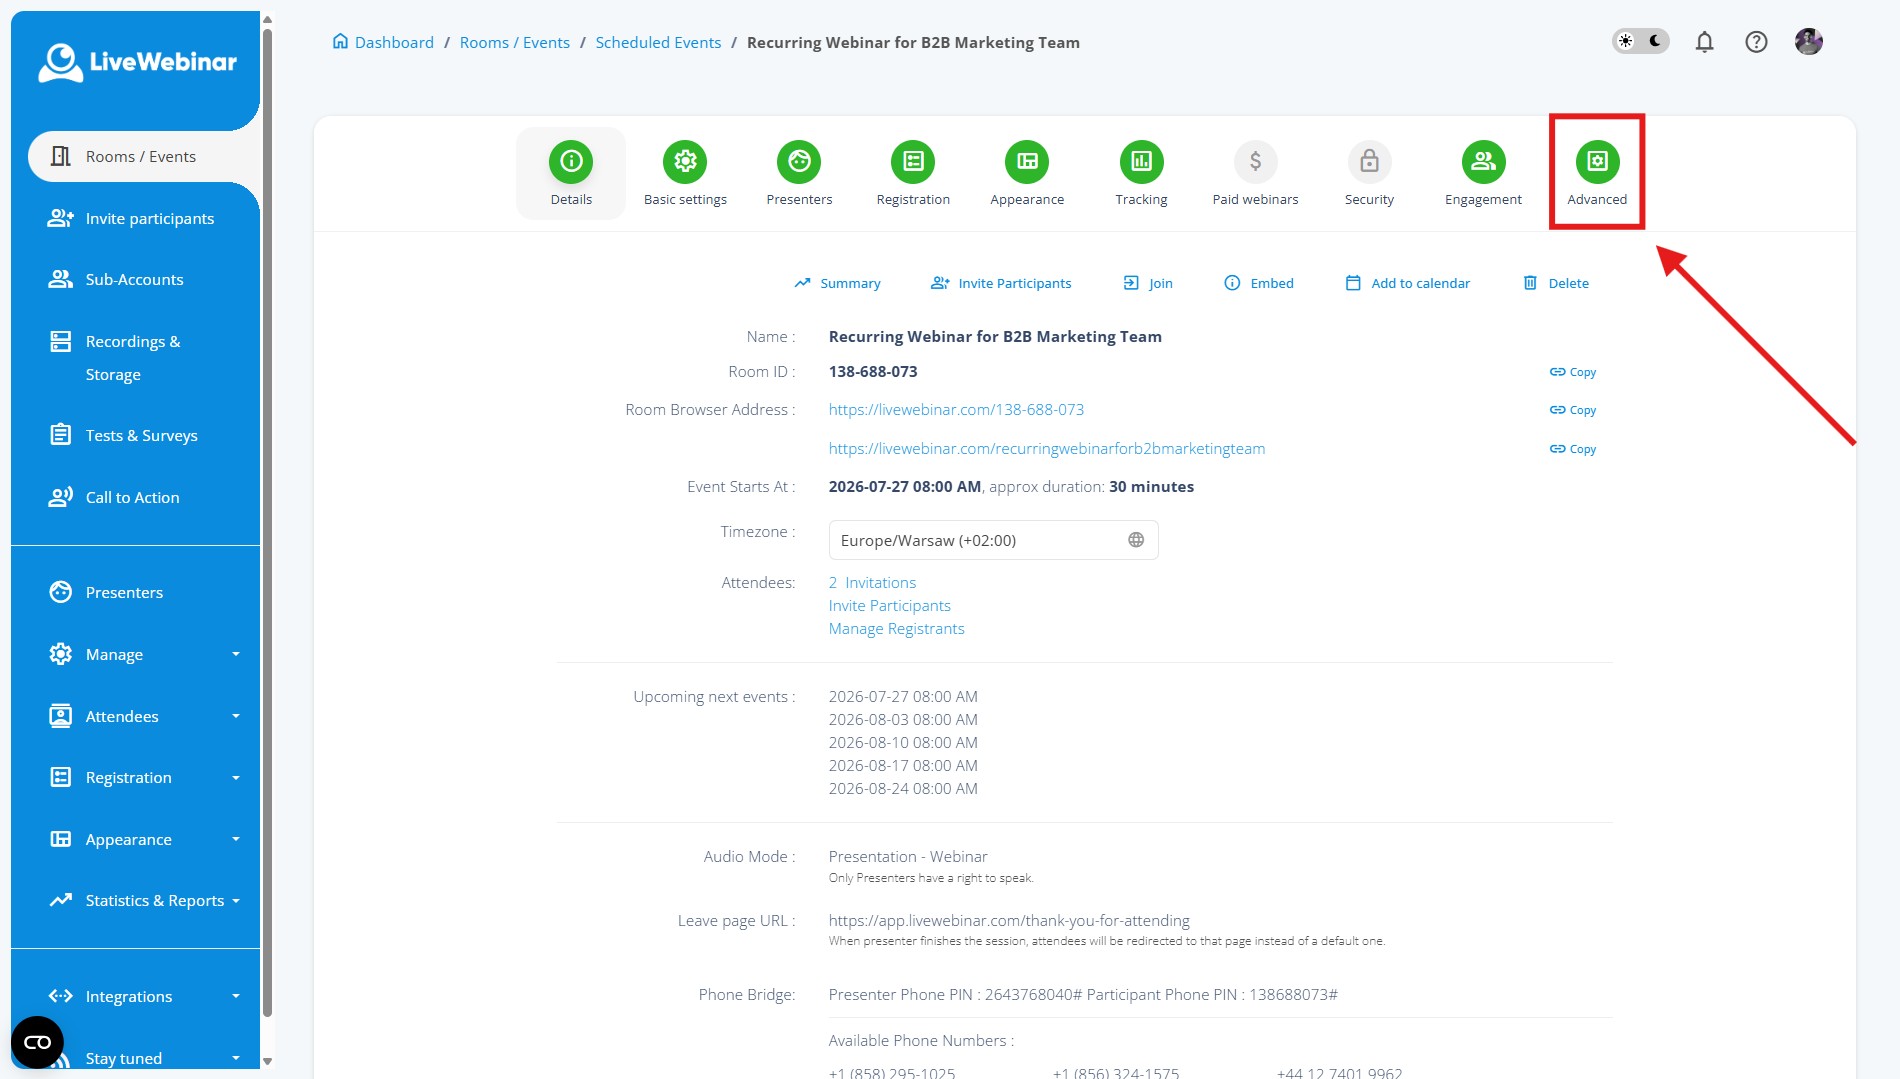
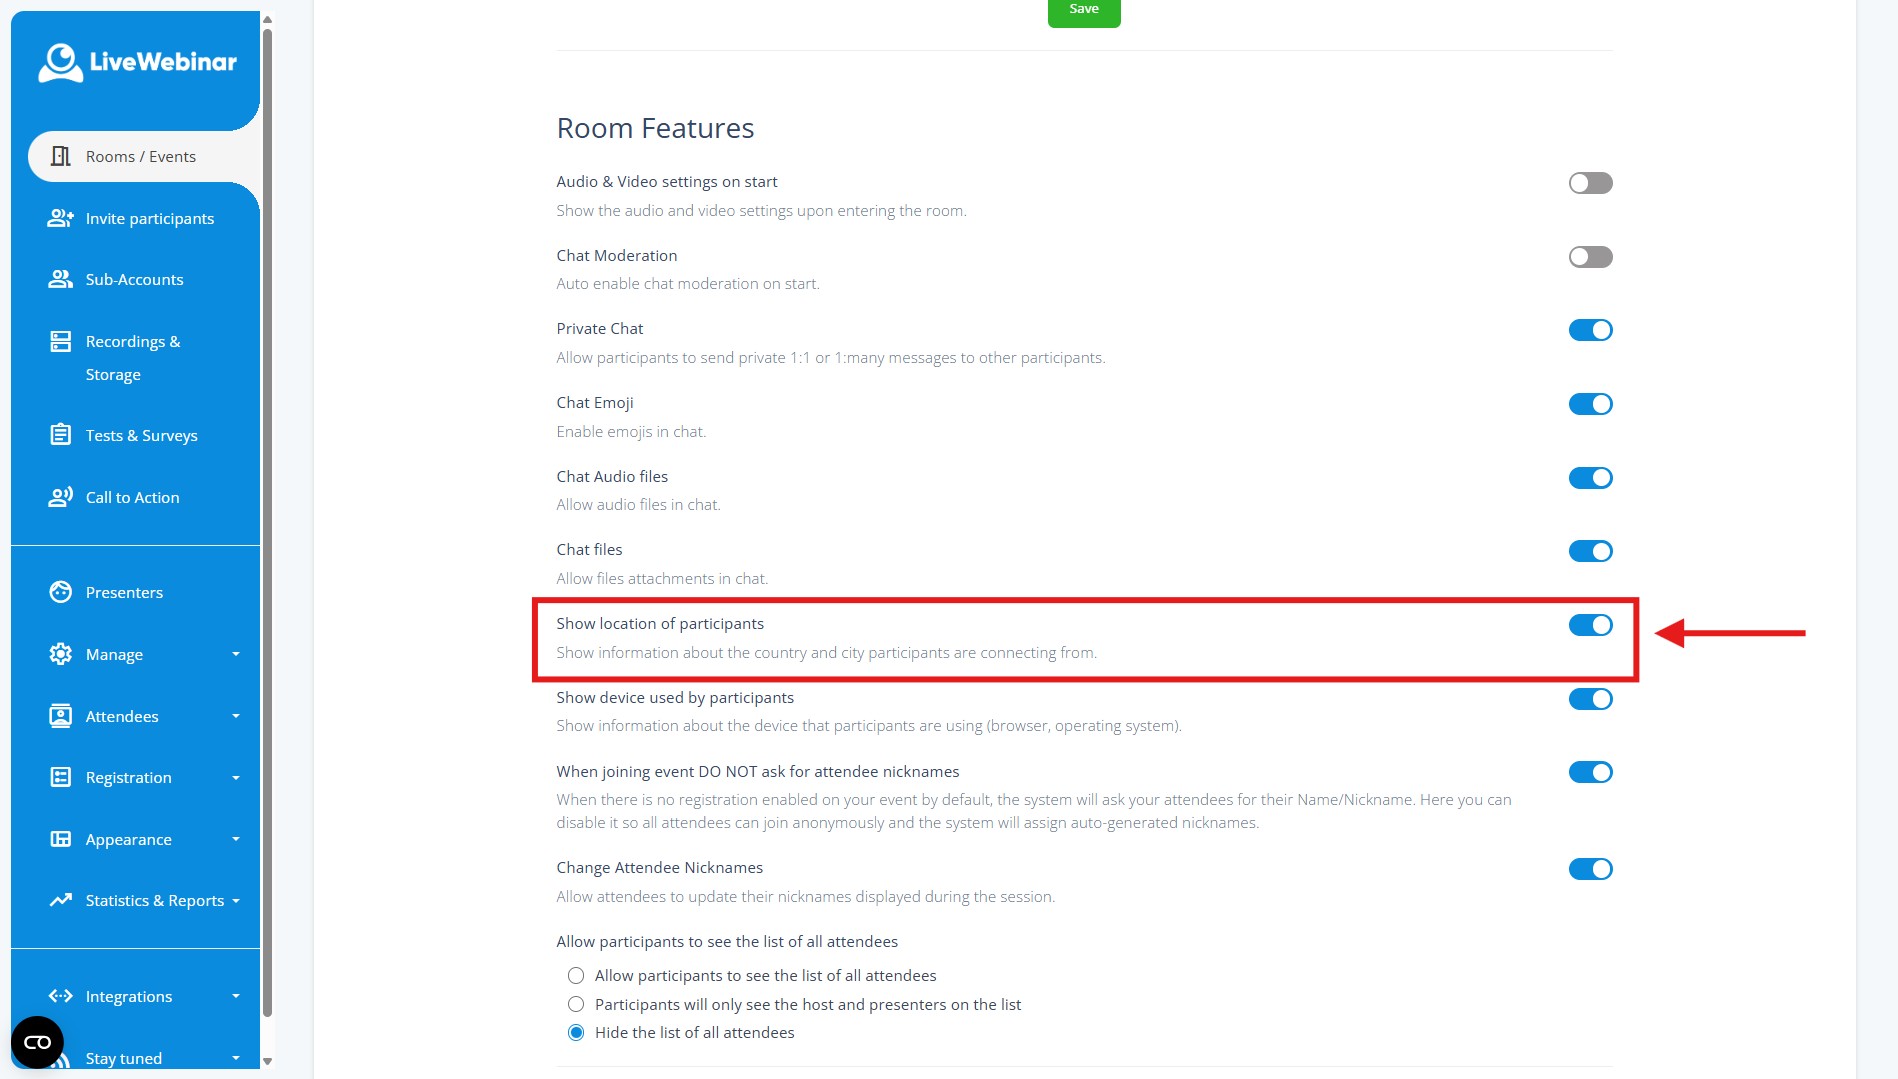
You can disable location tracking by navigating to Event Creator > Advanced Settings and switching off the geolocation toggle before publishing your event.
Tracking participant locations increases compliance risk under GDPR and CCPA. Disabling this setting stops the platform from displaying geographical data.
- Log in to your LiveWebinar dashboard and open or create a session.
- Navigate to: Event Creator > Advanced Settings
- Locate the Room Features section.
- Toggle the setting Show location of participants to Disabled.
- Save changes to update your event settings.
2. Enabling Name Anonymization (Initials Only)
How do you anonymize attendee names during a webinar?
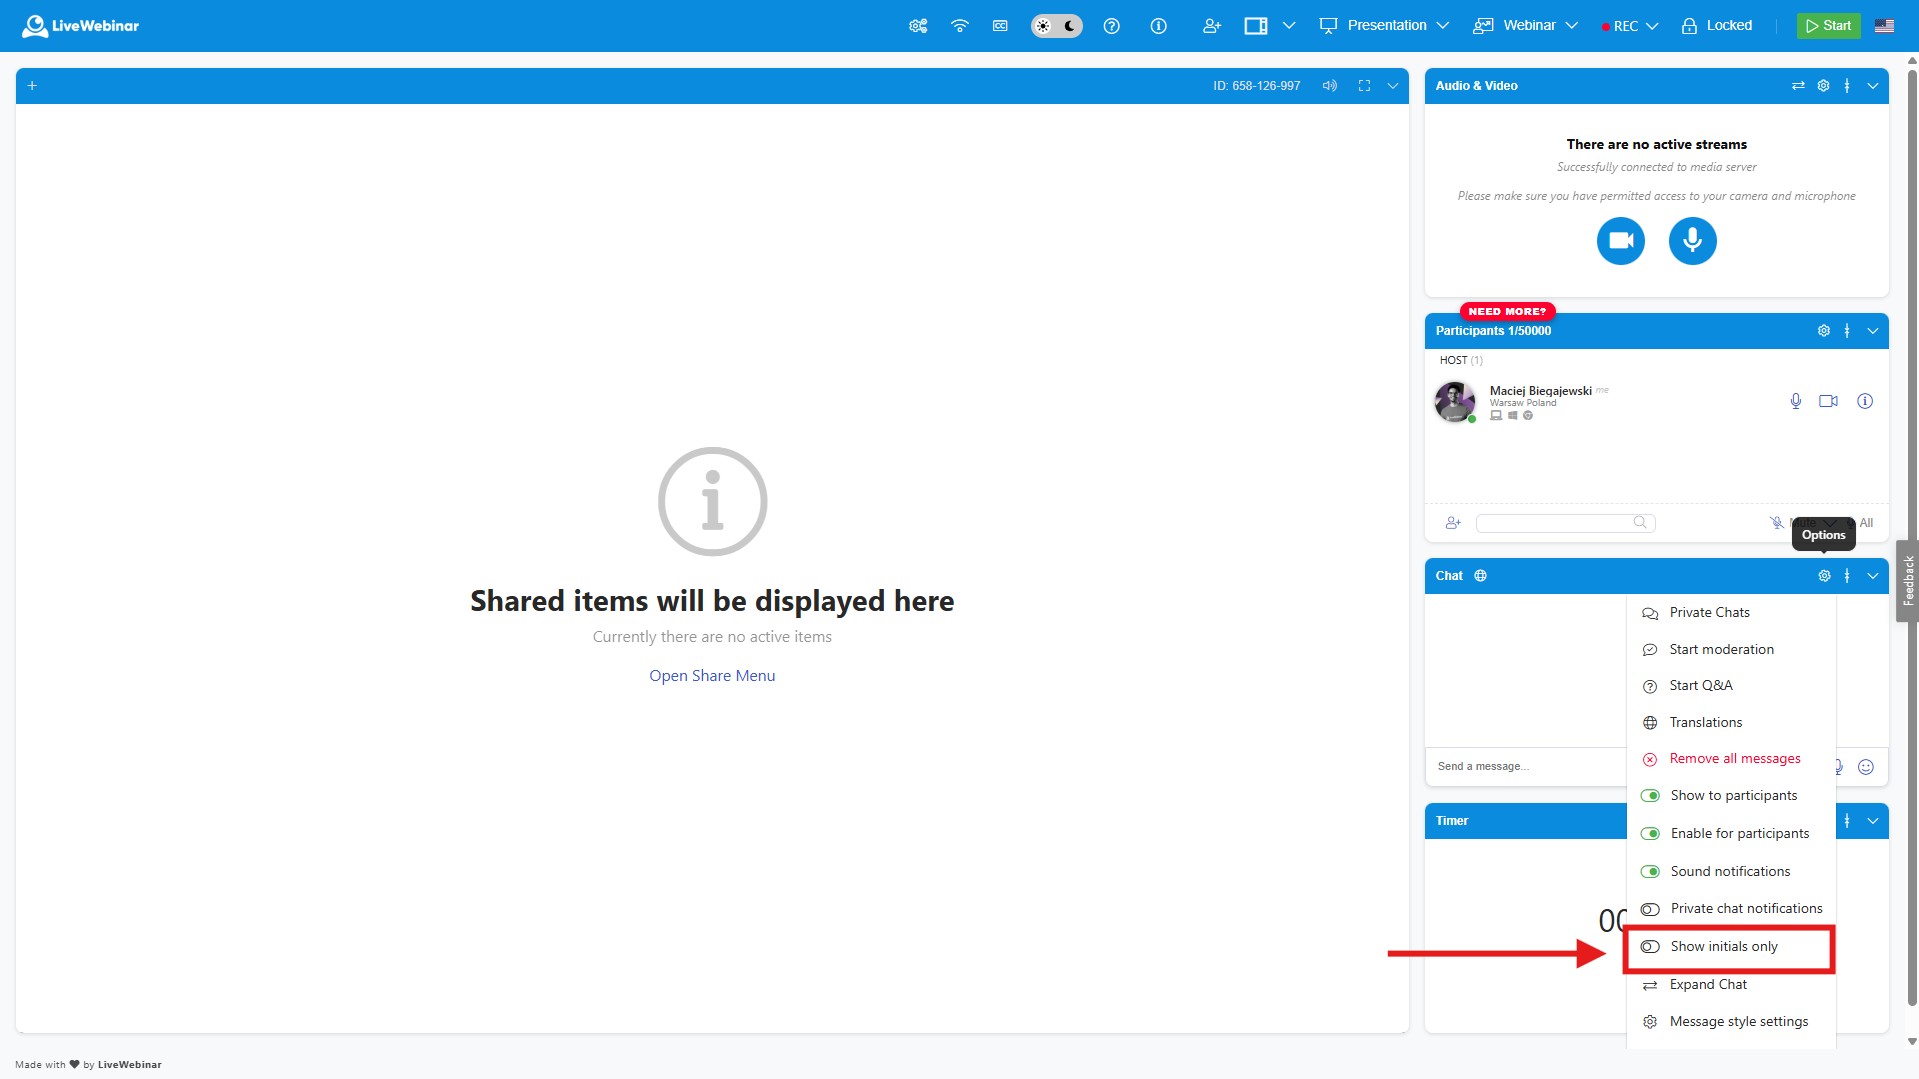
Enable name masking in Participants List Settings so public chat and Q&A interactions display only participant initials instead of full names.
To maintain attendee privacy during open discussions and public Q&A sessions, you can automatically convert displayed names into initials.
- Enter your scheduled webinar room or open the pre-event room settings.
- Go to: Participants List Settings
- Locate Show Initials only.
- Select enable it (e.g., "John Doe" will display as "J. D.").
- Apply the setting to obscure full names across the public chat and attendee view.
3. Hiding Device & OS Information
Why hide attendee device and OS information?
Hiding system icons prevents attendees from viewing technical metadata (such as device type or browser) about other participants, reducing technical profiling risks.
By default, some room layouts show icons indicating whether an attendee is using desktop, mobile, iOS, or Android. You can hide these indicators completely.
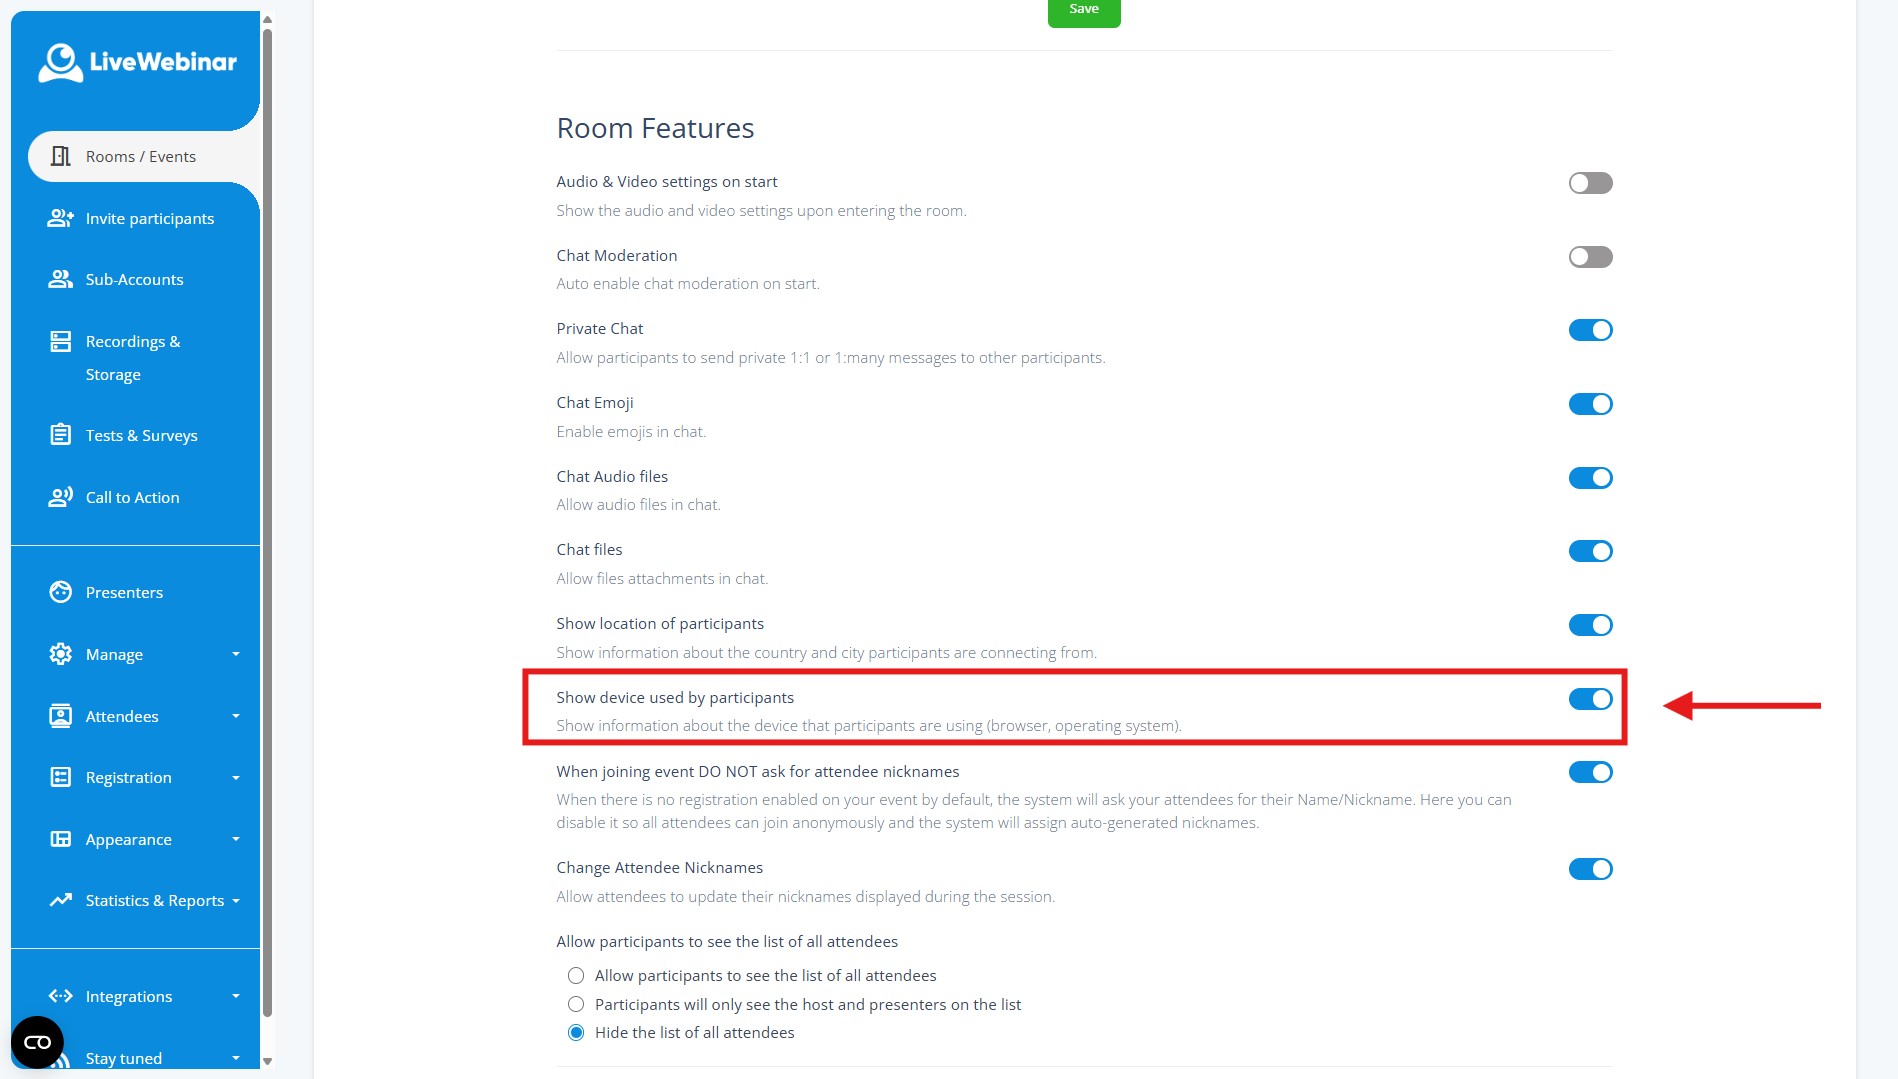
- Go to: Event Creator > Advanced Settings
- Locate the Room Features section.
- Toggle the setting Show device used by participants to Disabled.
- Save changes to update your event settings.
4. Hiding / Disabling the Attendee List
How do you hide the webinar participant list from attendees?
Open Participants List Settings inside the event settings and switch off the visibility option for standard attendees.
Hiding the full attendee list ensures attendees cannot view, copy, or scrape the list of other individuals present in the session.
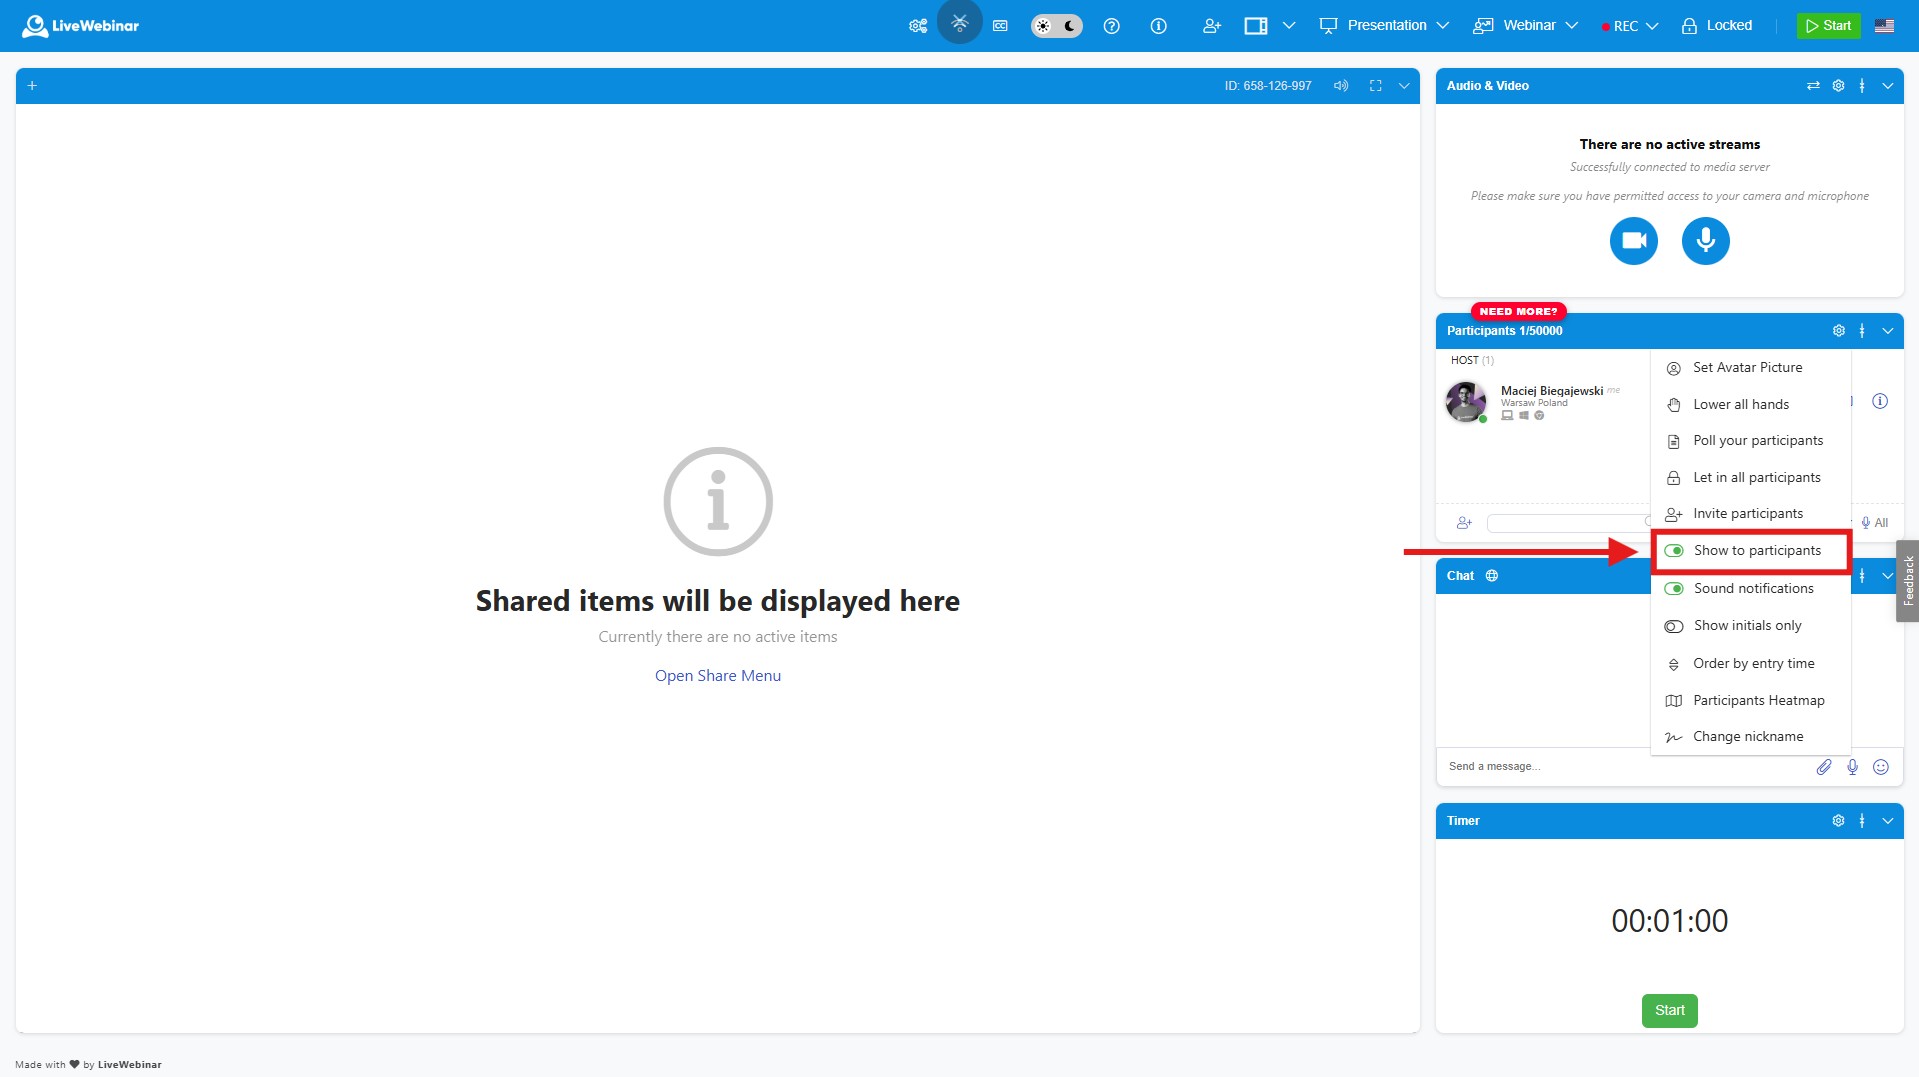
- Open Participants List Settings.
- Locate the Participant Visibility options.
- Disable Show to participants (Presenters and Hosts will retain visibility).
- Save your configuration.
5. Configuring Anonymous Event Recordings
How do you create an anonymous webinar recording in LiveWebinar?
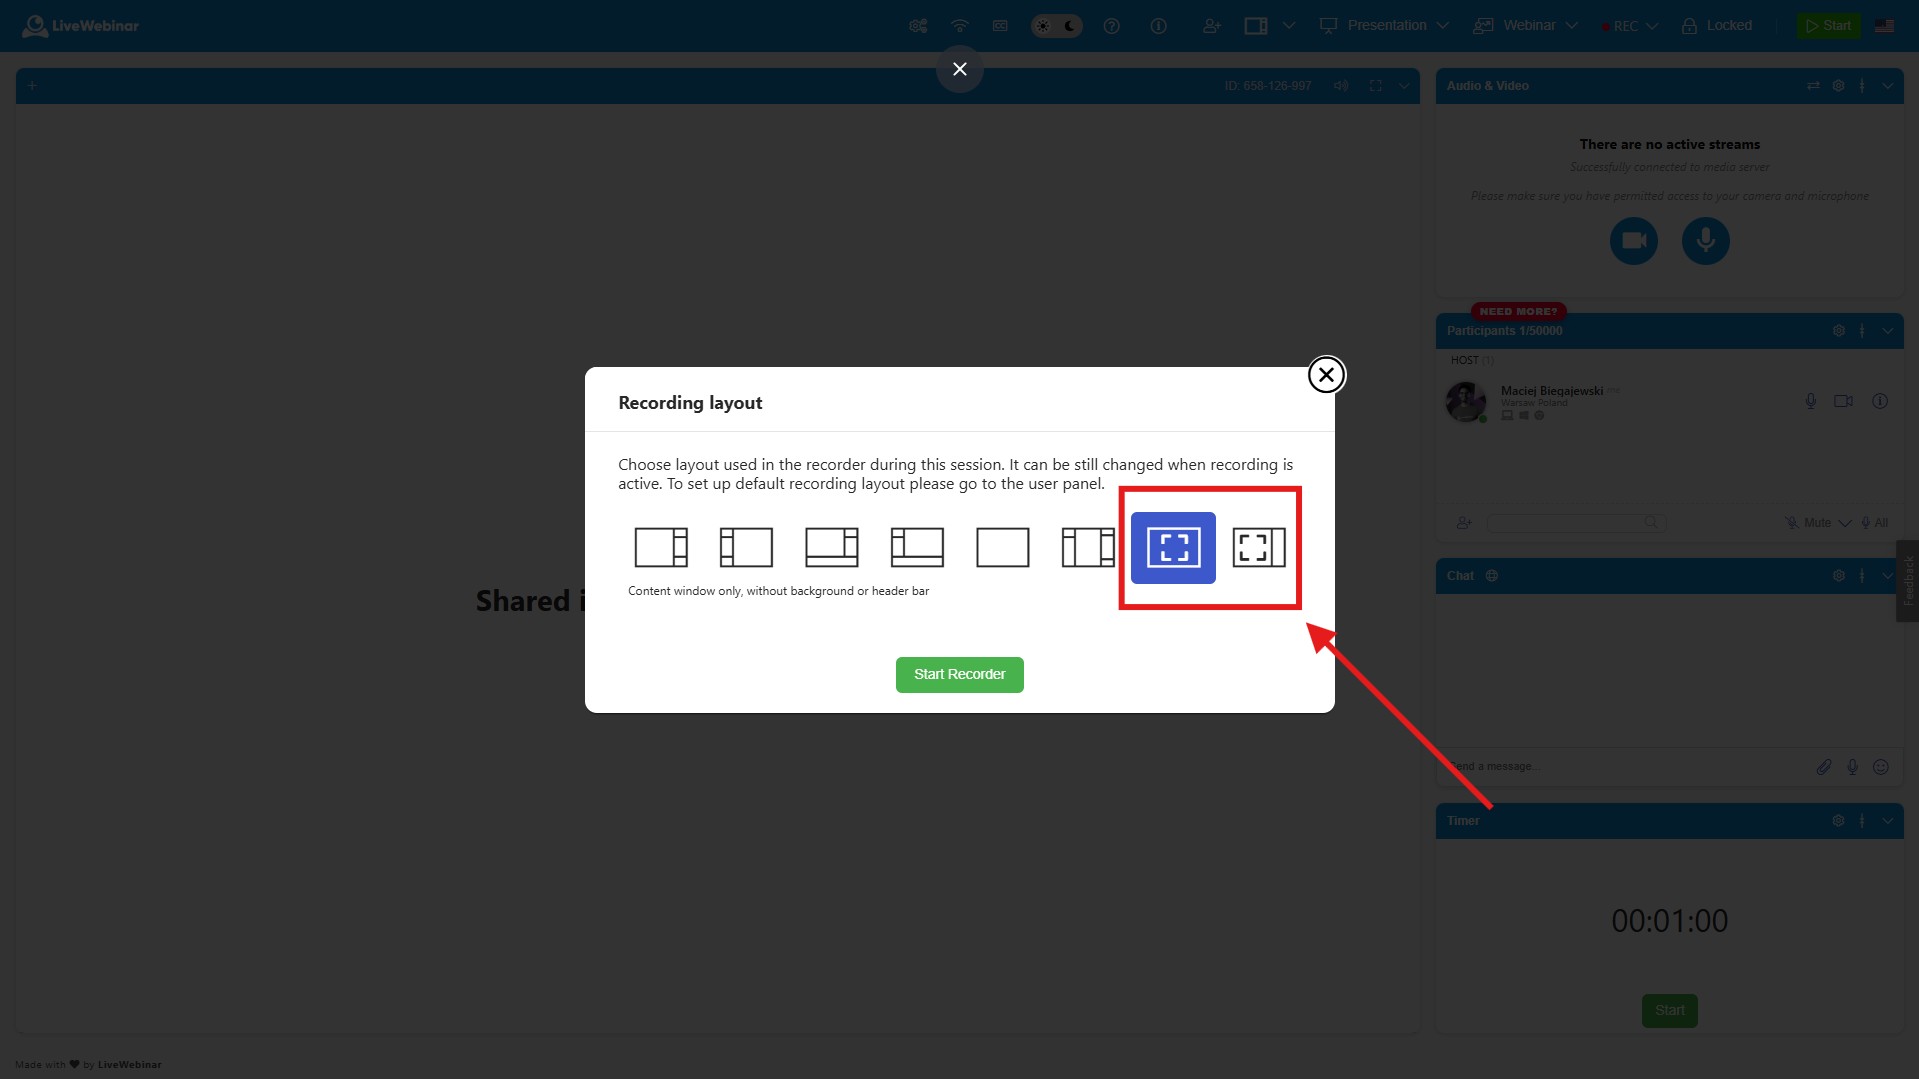
Select an anonymous recording layout under Recorder Settings > Recording Templates before starting the recording to keep chat logs and attendee lists out of the video file.
Standard event recordings may accidentally capture PII present in chat streams or side panels. Configuring an anonymous recording layout ensures post-event assets remain compliant.
- Before starting your session, navigate to: Recorder Settings > Recording Templates
- Choose a proper template (see on the screenshot)
- Click Save Preset.
- When you click Record during the event, the system will capture only the main stage content and presenter feeds.
Best Practices Checklist for Hosts
| Action Item | Verification Step | Compliance Focus |
|---|---|---|
| Clear Terms & Notices | Link your Privacy Policy on the registration page. | GDPR Article 13 / CCPA |
| Explicit Consent | Add opt-in checkboxes for marketing emails and data processing. | Opt-in Compliance |
| Anonymization Check | Confirm initials-only mode is active in Participants List Settings. | PII Protection |
| Metadata Shielding | Ensure device icons are toggled OFF in Advanced Settings. | Data Minimization |
| Compliant Recording | Verify the recording template excludes chat and attendee rosters. | Data Storage & Sharing |